The Editor says: The Olympus E-M1 Mark II has become the weapon of choice for many underwater photography masters in recent years. Its exceptional performance across every category has made it the undisputed flagship of the M4/3 system. But buying the camera is one thing — being confronted by a bewildering array of settings is another, often leaving shooters stuck in auto mode from start to finish. Or worse, you finally come face to face with a fascinating marine creature, only to spend the whole time fumbling with parameters and missing the shot. We are especially grateful to JIM & LYNN PHOTOGRAPHY — fresh from winning the Taiwan Regional National Award at the Sony World Photography Awards — for holding absolutely nothing back and sharing their complete Olympus E-M1 Mark II underwater photography settings with us!
Summer is just around the corner — are you ready to dive? For those of you who have chosen the Olympus E-M1 Mark II as your underwater camera, we're sharing our full camera settings here, in the hope that they help you get up to speed faster.
1. Quick Camera Comparison Chart
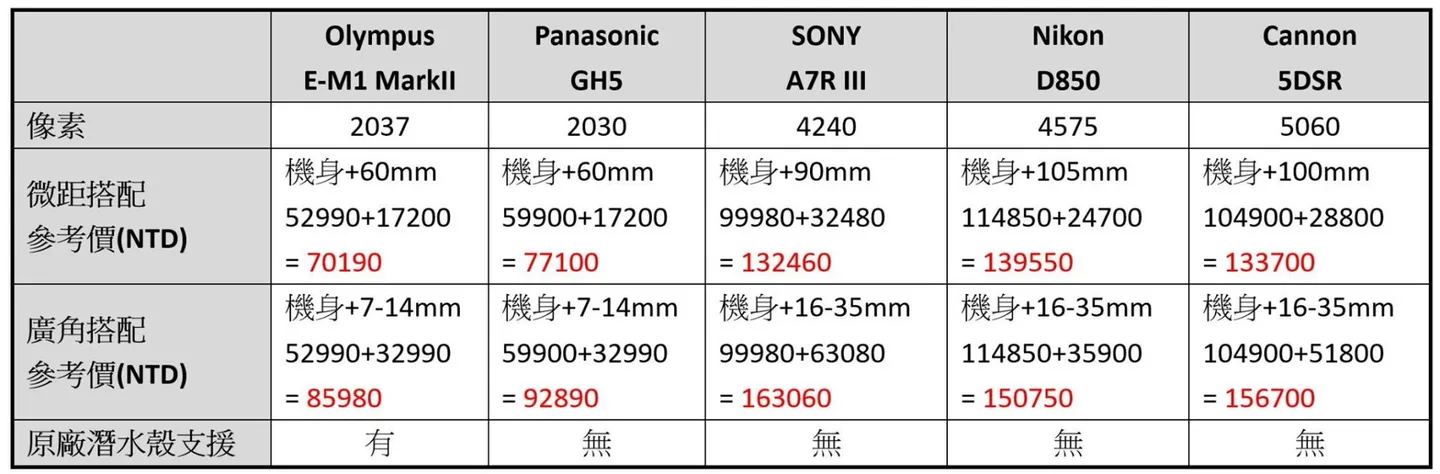
Product compatibility comparison chart across brands
2. Olympus E-M1 Mark II Quick Settings
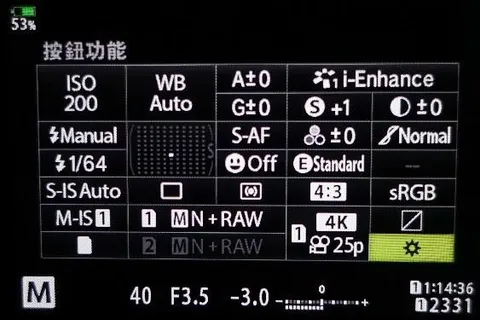
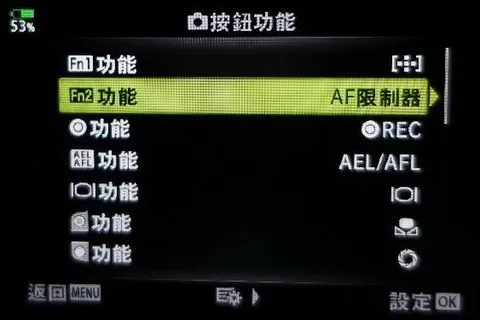
(1) Button Function
Path: Press OK / Quick Menu screen / Button Function / OK / Enter settings
Alternatively: MENU / Custom Menu / B / Button Function / Enter settings
Notes:
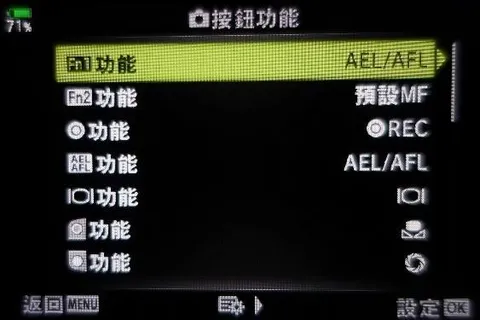
Fn1 is assigned to AEL/AFL — pressing the button activates AEL/AFL. On the Olympus housing, the Fn1 button sits in a spot that's easy to reach with the thumb, so assigning it to AEL/AFL makes it quick to use in underwater shooting situations.
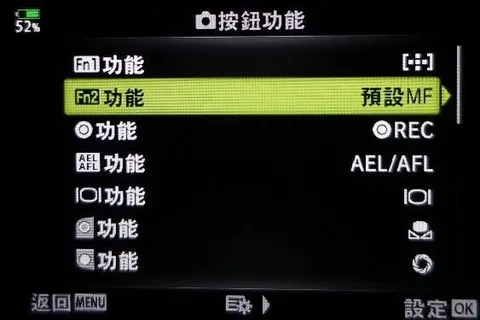
Fn2 is assigned based on personal macro shooting preferences — choose either the AF Limiter or MF Default. Both will be explained in detail below.
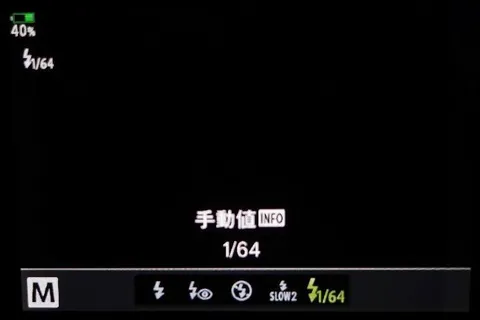
The directional pad is set to Direct Function. The right arrow is assigned to flash settings; it can be set to an output of 1/64, which helps extend battery life.

The down arrow can be assigned to Exposure Compensation, though this only works in P/A/S modes — it has no effect in M mode.
The down arrow can also be assigned to Underwater Mode, which is Olympus's experience-based preset designed to help users capture satisfying shots more quickly. Press the down arrow and select Underwater Wide-Angle Mode (3-fish icon); the default is all-area with 121 focus points. To switch, press the left arrow, then use the up/down arrows to select the focus area range.
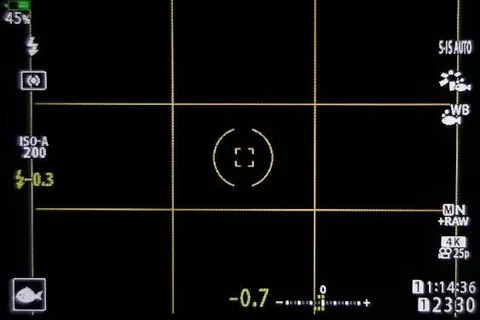
In Underwater Wide-Angle Mode, the default flash output is ±0.0 and the EV value is -1.0. You cannot adjust aperture (maximum f/4.0) or shutter speed (slowest 1/30 sec), but you can adjust the EV value. In Underwater Macro Mode (1-fish icon), the default is single-point AF. To switch, press the left arrow, then use the up/down arrows to select the focus area range. The default flash output is -0.3, and the EV value is -0.7. You cannot adjust aperture (maximum f/8.0) or shutter speed (slowest 1/125 sec), but you can adjust the EV value.


(2) RC Mode
Path: MENU / Shooting Menu 2 / RC Mode / Off or On / OK
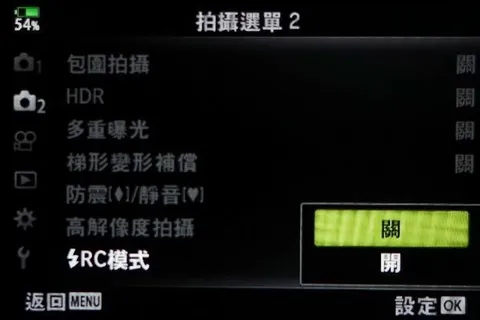
Notes: Turn this On when using the Olympus UFL-2 or UFL-3 flash. If you are using a flash from another brand, set it to Off.
(3) AEL/AFL Lock
Path: MENU / Custom Menu / A1 / AEL/AFL Lock
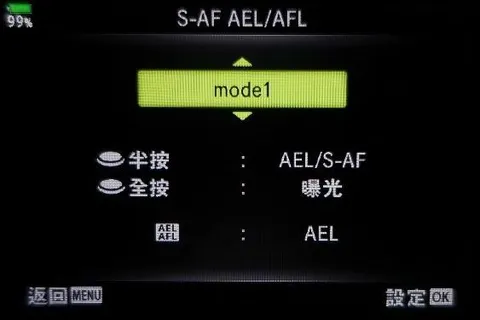
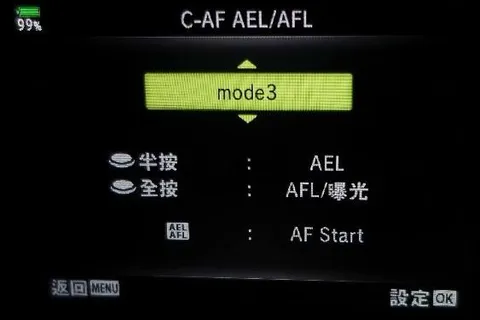
Notes: My settings are S1/C3/M3, for the following reasons:
S-AF (Single AF) set to Mode 1 – This is the camera's default focus mode. Half-press the shutter to focus, then full-press to shoot. I use S-AF when the subject requires refocusing each time.
C-AF (Continuous AF) set to Mode 3 – This decouples the shutter button from continuous AF, so that continuous focusing is triggered by holding the AEL/AFL button, while the shutter button is used solely to take the shot. Video is mainly recorded using C-AF, allowing focus to be re-adjusted during recording.
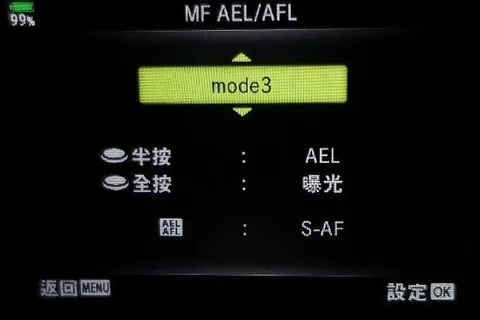
MF (Manual Focus) set to Mode 3 – Same as C-AF: the shutter button is decoupled from autofocus, allowing you to lock focus and fire the shutter multiple times without refocusing. In this mode you can focus manually or trigger autofocus via AEL/AFL. This is the perfect setting for general macro shooting.
(4) AF Limiter
Path: MENU / Custom Menu / A1 / AF Limiter / On / Distance Setting / Setting 1
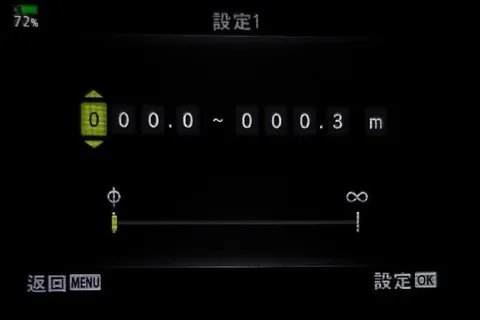
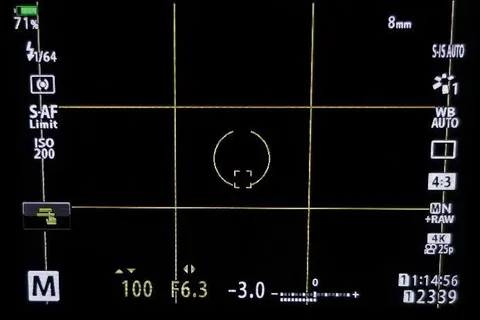
Notes: This restricts autofocus to a defined range — for example, 0–30 cm. It is extremely useful for macro photography and blackwater photography, and up to 3 presets can be stored. When the background contains reef structures or particles at a much greater distance than your macro subject, the camera may hunt across a wide focal range and cause you to miss the shot. With the AF Limiter active, autofocus is restricted to your specified range. This function can also be assigned to an Fn button for quick on/off switching. When the AF Limiter is active, the word "Limit" appears below "S-AF" on the left side of the camera screen.
(5) AF Target Custom Settings
Path: MENU / Custom Menu / A2 / (AF Target) Custom Settings / Setting 1
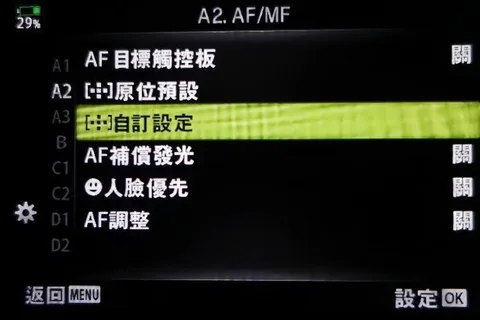
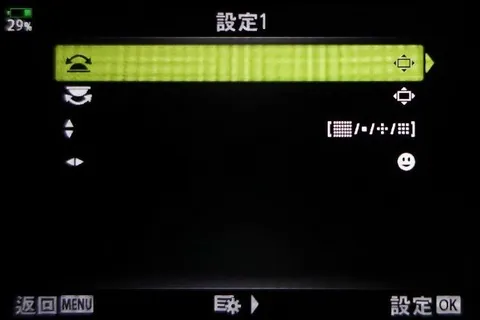
Notes: Use the front and rear dials to "adjust and move the AF target position." The up/down directional buttons are set to AF Focus Area, and the left/right directional buttons are set to Face Detection. The up/down buttons can also be set to "adjust and move the AF target position" — once configured this way, the left/right buttons will likewise change to "adjust and move the AF target position."
(6) MF Default Distance
Path: MENU / Custom Menu / A3 / MF Default Distance / 0m / OK
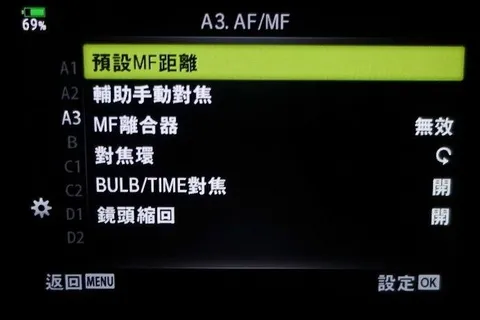
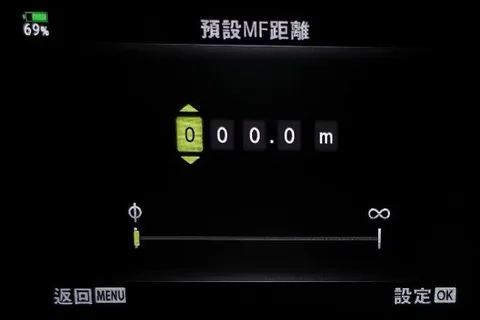
Notes: When shooting subjects that require maximum magnification, this pre-positions the manual focus point at the minimum focusing distance (maximum magnification). This function can also be assigned to an Fn button, giving you easy on/off control of the MF Default Distance.
(7) Disable the MF Clutch
Path: MENU / Custom Menu / A3 / MF Clutch / Disable / OK
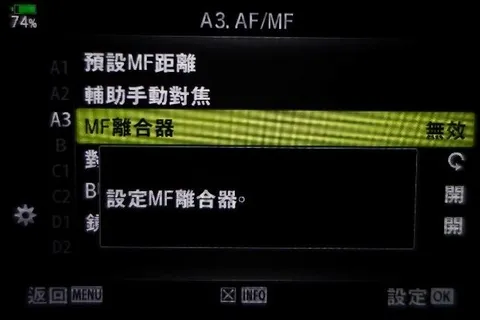
Notes: With the MF Clutch disabled, the camera will still autofocus even if the lens clutch is accidentally left in the MF position. When shooting underwater, the camera is inside a housing and you cannot switch lens modes freely the way you can on land, so it is best to disable this function. If you inadvertently leave the lens in manual focus mode, this setting overrides the clutch — even underwater, the camera will resume normal autofocus operation so you won't miss a shot during that tank dive.
(8) Dial Function
Path: MENU / Custom Menu / B / Dial Function / Enter settings / M
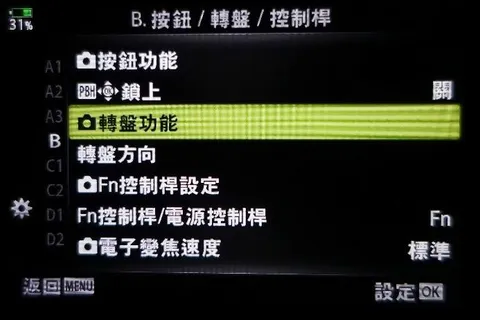
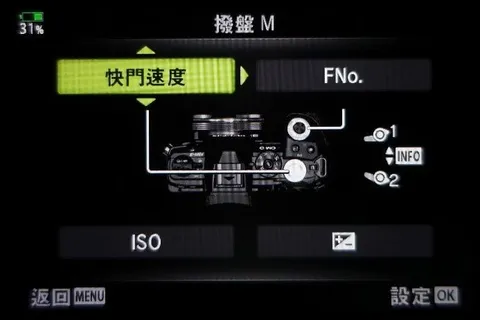
Notes: The rear (thumb-side) dial controls shutter speed; the front (index finger-side) dial controls aperture.
(9) Fn Lever Settings
Path: MENU / Custom Menu / B / Fn Lever Settings / Fn Lever Function / Mode 3 / OK
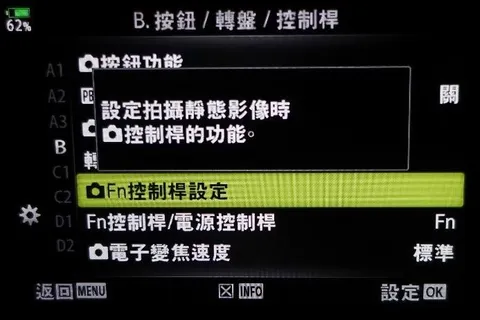

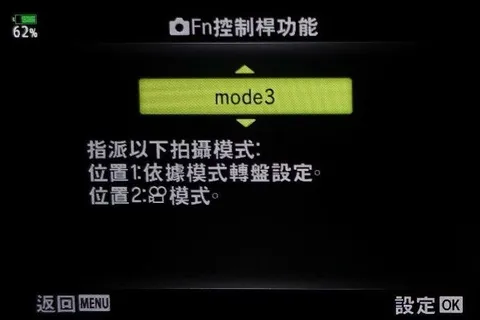
Notes: If you shoot underwater video, setting Mode 3 lets you switch to Position 2 before you start recording. From the video standby screen you can use the directional buttons to pre-set EV, white balance, ISO, and focus mode, and then begin recording.
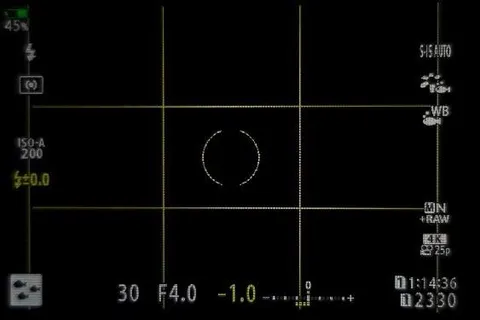
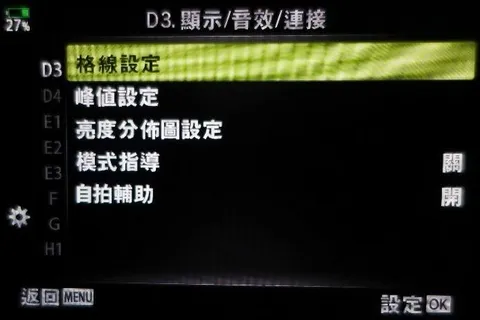
(10) Grid Settings
Path: MENU / Custom Menu / D3 / Grid Settings / Display Color / Preset 1
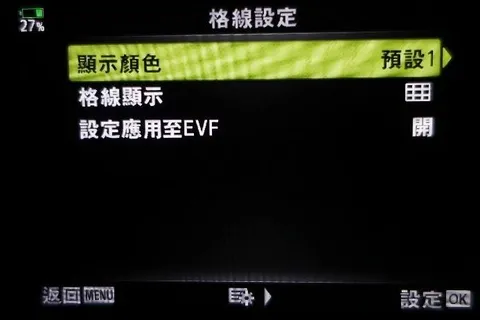
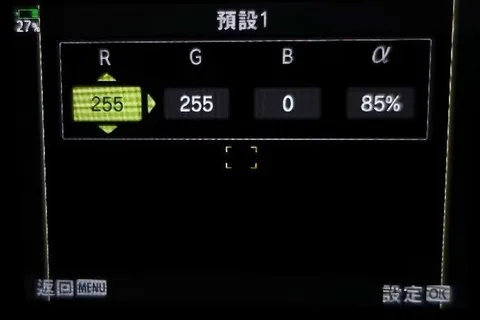
Notes: For the grid display color, setting it to yellow underwater makes it far easier to see. The recommended values are R
, G, B, α%.(11) EVF Settings
Path: MENU / Custom Menu / I / EVF Auto Switch / Off
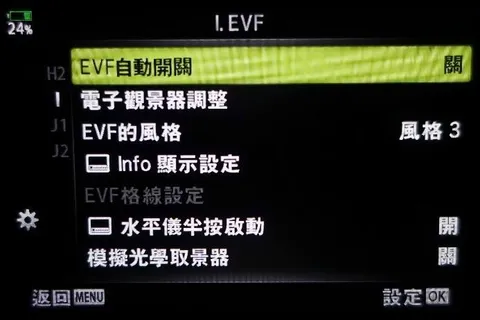
Notes: EVF Auto Switch – Off. This disables automatic switching between the camera monitor and the EVF. This is critically important for underwater use, because the housing sits close to the EVF sensor. If Auto Switch is left on, the camera may detect the housing as an object near the viewfinder and switch to the EVF, turning off the monitor — making it impossible to compose shots on the screen underwater.
(12) Power Save Settings
Path: MENU / Custom Menu / J2
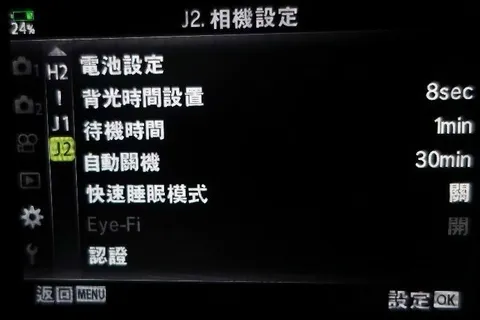
Notes: Backlight timer set to 8 sec, sleep timer to 1 min, auto power off to 30 min. These are the power-saving settings I find most suitable for underwater photography.
(13) Rec View Setting
Path: MENU / Setup Menu / Rec View
Notes: This controls how long the image is displayed on screen after shooting. The default is 0.5 sec. My personal preference is 2 sec.
3. Detailed Settings
The settings above are honestly all you need before getting in the water. If you'd rather not dig any deeper into the menus, feel free to skip the rest. For those who want the full picture, here are the detailed explanations.
MENU
(1) Shooting Menu 1
Picture Mode – Choose Vivid for more vibrant images; it boosts reds and oranges. This only affects JPEG files and has no impact on RAW files.
Image Quality – We recommend shooting RAW. We typically set this to SN+RAW, or RAW only.
Aspect Ratio – Use the standard 4
aspect ratio.Digital Tele-converter – Off.
(2) Shooting Menu 2
Bracketing – Off
HDR – Off
Multiple Exposure – Off
These settings can be used to create special effects and are more advanced techniques to be covered another time. For general underwater photography, leave them all off.
Keystone Compensation – Off
RC Mode – Off
Turn this On when using the Olympus UFL-2 or UFL-3 flash. If using a flash from another brand, set to Off.
Custom Menu
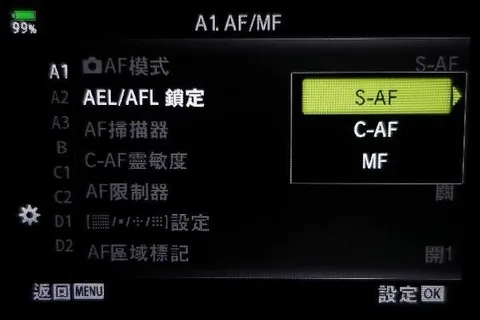
(3) A1. AF/MF
AF Mode – Choose S-AF, C-AF, or MF depending on whether you are shooting wide angle or macro, and based on the situation.
AEL/AFL Lock – This is extremely useful for underwater shooting, as it decouples focus lock from the shutter button. Once focus is locked, you can fire the shutter multiple times without refocusing. S1/C3/M3.
S-AF (Single AF) set to Mode 1 – The camera's default focus mode. Half-press the shutter to focus, full-press to shoot. Use S-AF when the subject requires refocusing each time.
C-AF (Continuous AF) set to Mode 3 – Decouples the shutter button from continuous AF, so that continuous focusing is triggered by holding the AEL/AFL button, while the shutter button is used solely to take the shot. Video is mainly recorded using C-AF, allowing focus to be re-adjusted during recording.
MF (Manual Focus) set to Mode 3 – Same as C-AF: the shutter button is decoupled from autofocus, allowing you to lock focus and fire the shutter multiple times without refocusing. In this mode you can focus manually or trigger autofocus via AEL/AFL. This is the perfect setting for general macro shooting.
AEL stands for Auto Exposure Lock. When shooting in Aperture-priority (A) mode with AEL active, reframing the shot will not cause the camera to recalculate the shutter speed. Similarly, in Shutter-priority (S) mode with AEL active, reframing will not cause the camera to recalculate the aperture. Try it in both a very dark and a very bright scene to fully appreciate the difference. AFL stands for Auto Focus Lock.
(4) A2. AF/MF
AF Target Touchpad – Off.
Home Position Reset – Turning the camera off and back on resets to a fixed focus area. The default is all-area; you can change this to a single-point focus area at a specific position to better suit your underwater shooting situation.
AF Target Custom Settings – Setting 1: use the front and rear dials to "adjust and move the AF target position." The up/down directional buttons are set to AF Focus Area; the left/right directional buttons are set to Face Detection. The up/down buttons can also be set to "adjust and move the AF target position" — once configured this way, the left/right buttons will likewise change to "adjust and move the AF target position." You can configure a second preset yourself.
AF Illuminator – Off. This is the camera's red AF assist beam; turning it off conserves battery.
Face Priority – Off. The camera will automatically focus when it detects a "face," but this can misfire underwater and will not detect a diver's face behind a mask, so there is no need for this function.
AF Adjustment – Off. This adjusts the autofocus point for each lens. It is an advanced function; the default is off.
(5) A3. AF/MF
MF Default Distance – When shooting subjects that require maximum magnification, this pre-positions the manual focus point at the minimum focusing distance (maximum magnification). I assign this function to Fn2, allowing easy on/off switching, and then use Fn1 for AEL/AFL autofocus. This is the perfect setting for general macro shooting.
MF Assist – When using manual focus, the camera screen magnifies the image and shows focus peaking. This requires a prime lens with a focus ring.
MF Clutch – Disable. With the MF Clutch disabled, the camera will still autofocus even if the lens clutch is accidentally left in the MF position. When shooting underwater, the camera is inside a housing and you cannot switch lens modes freely the way you can on land, so it is best to disable this function. If you inadvertently leave the lens in manual focus mode, this setting overrides the clutch — even underwater, the camera will resume normal autofocus operation so you won't miss a shot during that tank dive.
Focus Ring – Sets the direction of focus ring rotation.
BULB/TIME Focus – Not needed underwater; leave at the default (On).
Lens Retract – Off; not applicable underwater. The lens position resets when the camera is turned off. Turning this off keeps the lens at its last position.
(6) B. Button / Dial / Lever
Button Function – Fn1 is assigned to AEL/AFL; pressing the button activates AEL/AFL. On the Olympus housing, the Fn1 button sits in a spot that's easy to reach with the thumb, so assigning it to AEL/AFL makes it quick to use in underwater shooting situations. Fn2 is assigned based on personal macro shooting preferences — choose either the AF Limiter or MF Default. Both will be explained in detail below.
The directional pad is set to Direct Function. The right arrow is assigned to flash settings; it can be set to an output of 1/64, which helps extend battery life.
The down arrow can be assigned to Exposure Compensation, though this only works in P/A/S modes — it has no effect in M mode.
The down arrow can also be assigned to Underwater Mode, which is Olympus's experience-based preset designed to help users capture satisfying shots more quickly. Press the down arrow and select Underwater Wide-Angle Mode (3-fish icon); the default is all-area with 121 focus points. To switch, press the left arrow, then use the up/down arrows to select the focus area range. In Underwater Wide-Angle Mode, the default flash output is ±0.0 and the EV value is -1.0. You cannot adjust aperture (maximum f/4.0) or shutter speed (slowest 1/30 sec), but you can adjust the EV value. In Underwater Macro Mode (1-fish icon), the default is single-point AF. To switch, press the left arrow, then use the up/down arrows to select the focus area range. The default flash output is -0.3, and the EV value is -0.7. You cannot adjust aperture (maximum f/8.0) or shutter speed (slowest 1/125 sec), but you can adjust the EV value.
Dial Function – For example, in M mode: the rear (thumb-side) dial controls shutter speed; the front (index finger-side) dial controls aperture.
Fn Lever Settings – If you shoot underwater video, setting Mode 3 lets you switch to Position 2 before you start recording. From the video standby screen you can use the directional buttons to pre-set EV, white balance, ISO, and focus mode, and then begin recording.
(7) E3. Exposure / ISO / BULB
Metering – The default is ESP metering. For more precise metering of a specific subject underwater, you can switch to Center-Weighted or Spot metering.
AEL Metering Mode – Default is Auto.
Spot Metering – Default is All. Options include spot metering, highlight spot metering, and shadow spot metering.
(8) F. Flash Custom Settings
Flash Sync Speed – Use the default of 1/250 sec, which is the fastest flash sync speed permitted on the Olympus E-M1 Mark II.
Slow Limit – Use the default of 1/60 sec; this can be lowered further as needed.
Flash + Exposure Compensation – Off.
Flash + White Balance – Default is WB AUTO.
(9) EVF
EVF Auto Switch – Off. This disables automatic switching between the camera monitor and the EVF. This is critically important for underwater use, because the housing sits close to the EVF sensor. If Auto Switch is left on, the camera may detect the housing as an object near the viewfinder and switch to the EVF, turning off the monitor — making it impossible to compose shots on the screen underwater.
(10) J2. Camera Settings
Backlight Timer – 8 sec.
Sleep Timer – 1 min.
Auto Power Off – 30 min.
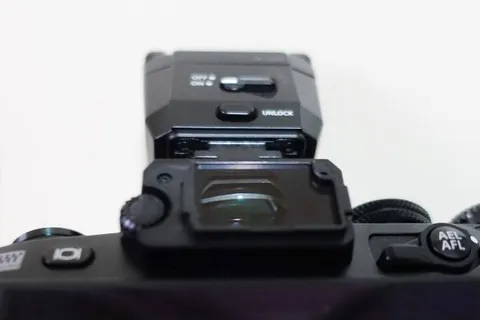
(11) Before fitting the camera into the housing, remove the viewfinder eyecup and make sure the flash is set to On.
Next up is the main event — Olympus E-M1 Mark II Underwater Settings Guide Part II, which covers three topics:
4. Using the Underwater Housing
5. Olympus E-M1 Mark II Macro Shooting
6. Olympus E-M1 Mark II Wide-Angle Shooting
Currently being compiled — stay tuned......
Related links: